Tuesday, 10 December 2024

Fixing things - Christmas edition

After an incident with a fox in the garage last year and time taking it's toll, several of the Christmas lights were in-operational when we took them out the loft this December. Not to worry though. I decided to go for the repair option.

Outdoor lights

The outdoor lights were victim of the fox in the garage. Unfortunately from stress it bit through the cable... As it was on the low voltage circuit this was a simple case of stripping back the wires and re-soldering:

And here they are working:


Reindeer

We bought an outdoor reindeer back in 2020 (to add a bit of extra cheer to the Covid year) but almost immediately the LEDs started showing signs of rust. Not so outdoor-friendly unfortunately. It managed to stagger through until last year when several lights failed. So I stripped of the old LEDs and replaced with 2x 5m battery powered LEDs

Leaky Battery

Finally, I accidentally left batteries in one of the indoor lights over the year and they leaked and corroded the spring contact completely. Fortunately this was a standard AA size and a clean and replacement was enough to get the lights working again:

So a great outcome. Fixing three Christmas lights for less than £15 postage and packaging. And of course much less waste that would otherwise have been made.


Wednesday, 28 June 2023

Gitlab and Quantum Computing Code

So, I've been looking at Quantum Computing recently and as part of this I thought I'd also take the opportunity to learn GitLab by creating a repository with my scripts.

Gitlab

I setup a GitLab account using the free tier and then created a new project, "quantum"

Setting up SSH

To use SSH keys for communication with GitLab, I followed the instructions in the GitLab Docs to create an SSH key and add to my Profile

For Linux my ssh folder is ./ssh. To generate a new key, run

ssh-keygen -t ed25519 -c "A comment"

And follow the prompts for creating a filename and Passphrase

Then from the GitLab page, click on my Profile image (default for now!) and select Edit Profile -> SSH Keys.

In the Key box paste the contents of the .pub public key I created in the previous step. (Starting with ssh-ed25119), set the Title, usage type of "Authentication & Signing" and finally Add Key.

Visual Studio Code Integration  

From the Visual Studio Code welcome page I selected Clone Git Repository...

I then used the Clone with SSH option from the Clone button to obtain the git url and simply pasted that into Visual Studio Code

Running the script

I have an Anaconda Python environment with cirq added. Details about this will be added later.


Tuesday, 20 June 2023

Setting up Unit Tests in Visual Studio 2022

A very quick blog post tonight. This came about when I wanted to setup a new Unit Test project for an existing .NET 6 solution. The problem came with setting up the project package references and I couldn't remember what to add. So for future reference, the packages I added from NuGet were:

  • NUnit - The main unit-testing framework
  • NUnit3TestAdapter - This is used for running NUnit 3.x tests in Visual Studio
  • Microsoft.NET.Test.SDK - MSBuild targets and properties for building .NET test projects
The project was created as a Class library (Console Application also works but it doesn't really make sense given it's not hosting its own executable)

Add a class and within this attribute the tests to be run with either [Test]

        [Test]
        public void Test_Something()
        {
            var expected = "Something";
            var testValue = DoSomething();
            Assert.That(testValue, Is.EqualTo(expected));
        }

Or [TestCase], if you want to supply parameters

        [TestCase("Test1", 1, 2)]
        [TestCase("Test2", 2, 3)]
        public void LatLong_To_Mercator(string testName, int input, int expected)
        {
            // Run test with parameters and Asset against expected
        }

One last thing, the documentation says to add [TestFixture] to the class but this doesn't seem to be needed. The tests run anyway.

Ahha!
Beginning with NUnit 2.5, the TestFixture attribute is optional for non-parameterized, non-generic fixtures. So long as the class contains at least one method marked with the Test, TestCase or TestCaseSource attribute, it will be treated as a test fixture.

Wednesday, 22 February 2023

Avalonia and Cross Platform .NET UI

A big advantage of .NET Core is the ability to write code once that can run on both Windows and Linux. This of course has been done before with Java but for those who use C# this was a huge step forward.

Unfortunately the existing UI Frameworks, Winforms and WPF were not supported on Linux so applications like the SuperMarketPlanner, although they were upgraded to .NET Core, were only able to run on Windows. 

Fortunately though .NET Core, now being open source is building a larger ecosystem and one such addition is Avalonia. This is a modern UI framework that can target both Windows and Linux. 

I initially played around before deciding to follow the excellent tutorial to build a Music Store App.

The framework is similar to WPF. We have a markup file to describe how the UI components are arranged, the View. A ViewModel is then setup to define how to bind the view to properties and commands.

As an example I setup a simple test that used a button to load and display an image. The view below shows the Button and Image elements, with the Image Bound to the Photo property:


And the ViewModel code sets up the property to the bitmap. There is a method to load the image from a file that's called from a button command (see the Music Store App demo for how to setup the command)


And here is the application running on Windows...


And Ubuntu...


Tuesday, 6 December 2022

Where did the disk space go?

I like a good mystery. Like this evening when I saw 130GB space free on my 800GB disk partition with only 280 GB of space being reported as used. Where did all the rest of the disk go?!

First up, I ran WinDirStat as an administrator, no, still reported 280GB. What was going on here?

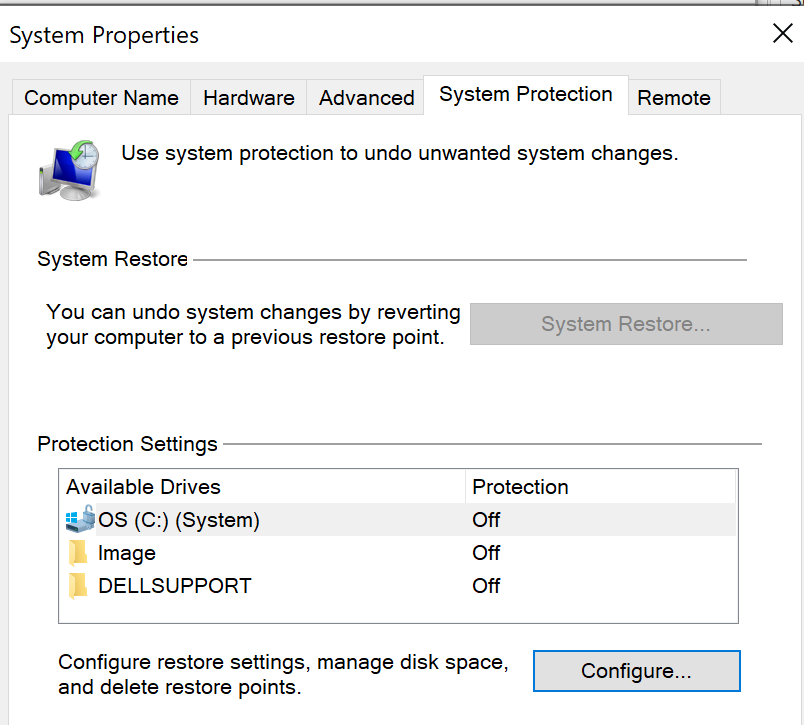
One cause for this apparent mismatch was System Restore points, which don't appear on Disk Usage reports, so to confirm I went and took a look.

In the search box, type Control Panel and open the Control Panel App:

Open All Control Panel Items > Recovery and select Configure System Restore:


Under the System Protection tab open Configure...


The maximum size for Disk Space Usage was set to the size of the disk and 400GB had already been used...


So, setting the Max Usage back down to 10% and there, I now had a decent amount of free space.


Saturday, 26 November 2022

BAD_SYSTEM_CONFIG_INFO

Oh dear. Monday saw a bit of stress with the Desktop PC failing to start. It booted into a blue screen with BAD_SYSTEM_CONFIG_INFO.

After it automatically tried to restore, with no success I tried the steps below

Error 0x74: Bad_system_config_info - Microsoft Support

  • System Restore: No restore point found 
  • System image recovery: Made it 50% through and said it couldn't continue
  • Safe mode: Wouldn't start in any safe mode configurations. Always returned to the same blue screen

At this point I was out of options so as a last resort decided to reinstall from an ISO image

I downloaded the media creation tool from: Download Windows 10 (microsoft.com) and flashed to a USB stick. 8GB is required for this.

Then on I needed to enter the BIOS (holding Esc on startup for this) and set it to boot from the USB.

After this everything went very smoothly. My PC is connected via Ethernet to the network so nothing was required to setup the internet connection and the windows license was still applied after installation.

Finally, and most fortunately, I had actually made a full backup of the PC only the day before so I hadn't lost any data. The last step to restore was painless.

As to why it failed like this? I don't know. I ran CHKDSK afterwards and nothing untoward was reported. Perhaps a bad Windows update? Although I didn't see any reports of issues like this. 


Tuesday, 22 March 2022

Setting up a new Python environment

Over many years of working in software development, managing dependencies to you code, whether in binary or source code format has always been a pain, to be honest. Take your pick from:

  • Cut and paste code
  • Linking against common libraries
  • Coping .zip files (with suitably convoluted folder structure)
  • Installing files to a common location
    • dlls
    • .NET GAC
  • Maven
  • NuGet
  • And so on..

And now into the mix comes Python with its 2.x (OK not really now) and 3.x versions, pip and conda..

A discussion of pip and conda can be found here

Anyway, having installed a new Ubuntu partition I wanted to get back the development environment I'd been using for the last couple of years. This is what I did...

Install Visual Studio Code

It's my tool of choice for Python. On Ubuntu I followed these instructions

I then installed the Python and Pylance extensions for VS Code

To check the Python environment being used, Open the Command Palette with Ctrl-Shift-P and then Python : Select Interpreter

Install Anaconda

It has its quirks but I have been using Anaconda. I installed from scratch using the instructions here.

The default installation included all the necessary libraries for simple machine learning code. 

Installing Cirq

I've been looking at Quantum Computing over the last year using Cirq. I couldn't get this installed using the instructions here.

However python -m pip install Cirq worked and it appeared in my Anaconda base (root) environment in VS Code. Success!

Installing Pygame

And finally, for some playing around with game programming I installed Pygame  with python -m pip install pygame.

So my environment is back up and running on a new OS installation.

Monday, 7 March 2022

Arrgh! Segmentation fault

My Physics analysis code runs in 3 modes. For 1996 data, for 1997 data and for both year's data. The 3rd mode also runs over different values of cuts. This is so as to build a set of results that can be used to estimate systematic errors in the analysis. For example, changing the value of the cut on Calorimeter energy can provide an indication of how well is is modeled.

To run all these checks a number of "Steering card" files were created. Each one listing out the cuts to be made for a single batch run. The analysis would then run over the entire set of '96/'97 data for each batch in turn and build a list of result ntuples.

Now, while running '96 and '97 individually was successful, when running both, on the second iteration the process crashed with the following.


The dreaded Fortran segmentation fault! 

In years gone by, I would have taken the approach of writing loads of print(*,*) statements around the "ANALYSE: File contains..." log and eventually homed in on the offending code but surely I can do better now!

It turns out I can. I can add a DEBUG flag: -fcheck=all -g

This is much more useful

(fcheck=all adds runtime checks for array bounds amongst other checks, -g adds extra information for the gdb debugger)

The line in isr_cuts96.fpp is:

call hf1(510,temp,1.)

This is filling a histogram  with data. The fact it's failing on the second iteration of the batch suggests the histogram isn't being correctly cleared down after the first run. 

The module I have to do the clearing down is called terminate.fpp

A review of the HBOOK User Guide led me to needing this call

CALL HDELET ID
Action: Deletes a histogram and releases the corresponding storage space.
Input parameter description:
ID identifier of a histogram. ID deletes all existing histograms.

Adding this to terminate.fpp fixed the problem and I am now able to run multiple batches in the same process

call hdelet(0)

Why this ran OK back in 2000 is probably a combination of the older CernLib library and Fortran compiler.

Monday, 31 January 2022

Updating from .NET Core 3.2 to .NET 6.0

With a couple of projects on .NET Core 3.2 I thought I would update to .NET 6.0. This was pretty simple!

First, update the TargetFramework in the project references to net6.0:
     <TargetFramework>net6.0</TargetFramework>

Next, I took the opportunity to update NuGet references to the latest versions. I also cleared the NuGet cache with:
     dotnet nuget locals --clear all

At this point Visual Studio 22 Intellisense started warning that references were missing, although the code compiled properly and the Test Runner couldn't fine any of the tests. To resolve this I deleted the .vs folder and restarted.

In the SuperMarketPlanner XAML application, to fix a new compiler warning, I changed the Project SDK in the csproj from
    Project Sdk="Microsoft.NET.Sdk.WindowsDesktop"
to 
    Project Sdk="Microsoft.NET.Sdk"

Finally, in the Azure Pipeline yaml I had to update the SDK to the following:

steps:
- task: UseDotNet@2
displayName: 'Install .NET Core 6.0.x SDK'
inputs:
version: 6.0.x
performMultiLevelLookup: true

Saturday, 22 January 2022

Running ZEUS Analysis Code


Although I built CERNLib a long time ago, apart from running PAW and looking at some old Ntuples I didn't get round to building my old ZEUS analysis code.

Setup the Environment

CERNLib is available as a package on Ubuntu.  However I've seen issues around running this on 64bit Linux. So for practicality I decided to setup a 32bit Linux VM. As noted before I opted for Linux Mint on VirtualBox. I picked the 32bit version of Mint 19.3 Tricia. 


Code Changes

So the Fortran compiler has moved on a bit since October 2000 which was the last time I ran this code. I needed to make a few changes to successfully compile my source. Fortunately nothing too significant was required.

.EQ. to .EQV.

I was using .EQ. for logical comparison of a LOGICAL variable, for example:
        IF (Q2WTFIRST.EQ..TRUE.) THEN
However this should be .EQV. :
        IF (Q2WTFIRST.EQV..TRUE.) THEN

Using 1 and 0 for True and False

Related to the above, a compiler error was thrown when using .eq. and 1 or 0 to represent true or false

tltcut = 0
... Change tltcut to 1 if the condition is met
if (tltcut.eq.1) then

Fix was to change the condition to:
        if (tltcut) then

DFLIB

At the time Bristol University were trying out Visual Fortran (DEC now Intel Visual Fortran) . We used this library in a Math error handler routine. DFLIB has quite a history but the upshot is it's only supported on Windows. I just took out the routine using it!

Makefile

Using Visual Fortran the build and linker was controlled by a. To build using gfortran in Linux I had to create a Makefile. This is an art in itself! The main issue I had to overcome was linking the CERNLIB libraries. The required libraries below, mathlib, packlib and kernlib were available to the linker with the standard path. pdflib however was in a separate folder that needed including with the -L flag. Some looking around to find the correct name was required, in the end I needed pdflib804.

-L /usr/lib/i386-linux-gnu -lmathlib -lpacklib -lkernlib -lpdflib804

.inc Files

Include files in Fortran are inserted into the source program. This is useful if you have a common block that you don't want to write over and over, for example defining variables. 


This was referenced in the source files with :
        #include "common.inc"

Incidentally, the # indicated the file was processed by a C preprocessor rather than the standard Fortran include.

My inc files were mixed in with the Fortran source files. The compiler didn't like this so I updated the folder structure to use separate src/inc/exe folders. Funnily enough this reflected the original folder structure when I ran the code on Unix boxes before we switched to Visual Fortran. The circle is complete!

How to run the Analysis code

This took a bit of remembering. The code was driven by a number of input files. 
  • Steering cards. This contains a list of cuts made to select the events. Different cards would define different cuts and therefore allow me to analyse systematic errors
  • File listing input Data .rz ntuples
  • File listing input Background .rz ntuples
  • File listing input MonteCarlo .rz ntuples
Of course, naming convention wasn't particularly useful, for a run on 1997 data there would be:
  • stc97_n for the steering cards
  • fort.45 for the Data file list
  • fort.46 for the Background file list
  • fort.47 for the MonteCarlo file list

I should make clear at this point that the files I'm running against are not the "raw" ZEUS datafiles. A preliminary job was run against the full set of data on tape to load a cutdown set of data that passed some loose cuts and create an ntuple with the necessary fields for this particular analysis. My ntuples were saved after this first step.

Results

I ran the code against a single 1997 data, background and MonteCarlo ntuple.

This created, amongst some other files, an israll97.hbook file. By opening PAW and entering hi/file 1 israll.hbook I was able to load this. hi/li listed the available histograms, this looked about right and when I opened one of them with hi/pl 105 success! I had created a histogram of the E-Pz (Total Energy - Momentum in the z, or beampipe direction) from my saved data files. I used this originally to help select the population of events to use in my analysis.


I've put the code up on GitHub:

The README.md describes the list of input and output files.

Next steps...
  • Run the PAW macro (kumac) files I used after this analysis step and add to GitHub.
  • Run against the full data set. I want to see how quickly this runs on current hardware. To run the full 96/97 data set against all steering cards would take about 20 hours!
  • Create a GitHub release to include sample .rz files. Hopefully to allow anyone to run this!
  • Try and build the 64bit version of CERNLIB so I don't have to run on a 32bit VM.

Wednesday, 12 January 2022

Adding Azure Pipeline status to GitHub README.md

I noticed in some GitHub projects a build status badge in the README.md display. As I have Azure Pipeline builds setup for two of my projects, CSVComparer and SuperMarketPlanner, I thought it would a good idea to add this.

Handily, there is a REST API interface available for the Azure Pipeline build!

The link for the badge is of the form:

https://dev.azure.com/{Organisation}/{Project}/_apis/build/status/{pipelinename}

For CSVComparer that's: 

https://dev.azure.com/jonathanscott80/CSVComparer/_apis/build/status/jscott7.CSVComparer

Then I can add a hyperlink to the badge to navigate to the latest build page when clicked. This is of the form:

https://dev.azure.com/{Organisation}/{Project}/_build/latest?definitionId={id}

Again, for CSVComparer that's: 

https://dev.azure.com/jonathanscott80/CSVComparer/_build/latest?definitionId=2

The definitionId is the ID of the Pipeline assigned by Azure. You can find this by navigating through to the Pipeline page via https://dev.azure.com/{Organisation}/

(Useful link for the official docs here : Azure Pipelines documentation | Microsoft Docs)

Finally, to put it all together add this to the README.md file:

[![Build Status](https://dev.azure.com/jonathanscott80/CSVComparer/_apis/build/status/jscott7.CSVComparer)](https://dev.azure.com/jonathanscott80/CSVComparer/_build/latest?definitionId=2)

Here is what it looks like:


And clicking on the badge takes us here:


Friday, 12 November 2021

Setting up a new Laptop (2021 Edition)

It's been 6 years since I last setup a dual booting laptop. That particular machine is starting to show its age now, particularly with a spinning disk hard-drive.

Before doing anything I created a Recovery USB. Search Recovery Drive on the task bar to open Recovery Media Creator. I followed the instructions to setup a recovery drive on a 32GB USB drive.

The new machine has a 1TB SSD and I wanted to really keep as much as possible for Windows. So, I checked how much space I used on my existing Linux install. The command df . -BG is useful for this. giving space used in GB. It turned out I had only used 75 GB. 

I downloaded the Ubuntu 21.10 ISO and used Startup Disk Creator to flash it to an old 4GB USB stick

To free up space for the Linux installation I needed to shrink the Windows disk partition. I used the Windows tool for this. Search for "Create and format hard disk partitions". This opened the Disk Management Tool:


I right-clicked on the main Windows Partition and selected Shrink... I then shrank by 150GB.

Once everything was in place. I inserted the Ubuntu USB and rebooted. For this machine I needed to explicitly tell it to boot from the USB by hitting F12 during startup to be able to change the boot order.

A welcome screen should pop up with options to Try Ubuntu or Install Ubuntu. Select the latter and follow the next screens, selecting language, keyboard and Wi-Fi when asked. 

  • When you get to Installation Type select "Something else, you can create or resize partitions yourself"
This will open a window listing the partitions. The empty 150GB partition created earlier is visible here. Select it and click on + to create a new partition. Do this twice:
  1. Create a Swap Partition. Select Logical Partition, beginning of this space and choose a size (I used 4GB) and under Mount point choose Swap
  2. Create a Root Partition. Select Primary Partition, beginning of this space and let it take the remaining space. Under Mount point choose /
Previously I created a home partition but decided I didn't really need it this time.

After going through the remaining screens the installation proceeded. 

Jittery screen
The Ubuntu installation was a success but the screen did have jitters, especially duing start up. I found the solution to this by editing /etc/default/grub and changing the GRUB_CMDLINE_LINUX_DEFAULT line to:

GRUB_CMDLINE_LINUX_DEFAULT="quiet splash i915.enable_psr=0"

After editing enter sudo update-grub and reboot

PSR is a Power saving setting (Panel Self Refresh) used to optimise power consumed by buffering some frames to the display when the view is static.

Bitlocker
After rebooting I now got the Grub menu to be able to select Ubuntu or Windows. When I selected Windows however I got a warning screen popup

"The system boot information has changed since BitLocker was enabled. You must supply a BitLocker recovery password to start this system."

I was able to log onto my Microsoft Account to obtain the recovery key: aka.ms/myrecoverykey

The machine can now boot easily to Windows or Ubuntu.


Monday, 16 August 2021

Python Range Bar Plots

I have some data in a json file that contains a list of timings for different tests. Each test has a name, start timestamp and duration in milliseconds. It looks something like this:

Now, I love the Matplotlib Python library. I used it a lot when learning Machine Learning during the 2020 lockdowns. It is an incredibly rich and powerful tool  for creating professional data visualizations. So, as I'm new to it I thought I'd see if I could create a Range Bar plot of these data. 

In essence I want to show each test as a individual bar, the size of which corresponds to the duration and each bar's left most edge corresponding to the start time.

Here is the script:

It's very simple. Most of the script is concerned with reading the data from the file and generating the data structures. I thought it would be nice to highlight the longest duration test in red. This would be useful for seeing if the times for different tests were close.
 
And the output:


Very simple. There are of course many options to polish this. I'll update the blog as I refine them.

Monday, 17 May 2021

.NET Versions and Transport Layer Security (TLS)

This little blog came about from looking into a strange problem where a query to a rest service was failing with :

System.Net.WebException: The underlying connection was closed: An unexpected error occurred on a send.

System.IO.Exception: Unable to read data from the transport connection: An Existing connection was forcibly closed by the remote host

The cause of this is from an inconsistent security protocol being used by the client and server. In this case the server is using TLSv1.2 and the client SSLv3.

You can get or set the SecurityProtocol in code:

I'm running this on .NET framework 4.8. So I should be using the SystemDefault protocol for the OS ( Windows 10) which is TLSv1.2. But when I printed out the output from the SecurityProtocol above I got SSLv3 | TLSv1.1 So what's going on?

Supported Runtime

In my app.config file I had the following startup entry:

Documentation here The versions are checked in order with the first one that matches a version installed on your being taken. If that version is present on your computer that will be used.

So with 4.5.2 the default version of SSL3 TLS1 and TLS 1.1 are used. 


There's a few fixes or workarounds for this. First build the code and retarget .NET 4.7.2 or later. Unfortunately this wasn't an option because I didn't own the executable code. This also ruled out explicitly setting the SecurityProtocol in code although this isn't recommended as it makes future changes difficult. You can also edit registry keys (see the link below) to change the default behaviour but I thought this would be too intrusive.

The solution was to add the following to the app.config:


For 4.5.2 this also requires the latest patches and registry keys . In an ideal word you would of course update. But software development rarely works in an ideal world.


Monday, 22 March 2021

Publishing .NETCore Application and running on Linux

Over the last year or so I've been writing a simple tool in .NET Core to compare two CSV files. It can be found in on GitHub here. I won't go into details about the tool in this post but being a .NET Core application I've been able to develop it on Windows and also deploy and run on Linux. This post describes how I published and deployed.

I've been using Visual Studio. When I want to create a new deployment I right-click on the Project and select Publish...

I have setup a profile, called "FolderProfile" (Very imaginative!)

  • TargetLocation : Folder name
  • Configuration : Release | Any CPU (from my solution)
  • Deployment mode : Framework-dependent
  • TargetFramework : netcoreapp3.0
  • TargetRuntime : Portable

(I used Framework-dependent deployment for cross-platform binaries. This creates a dll which can be run with dotnet <filename.dll> on any platform. Of course this requires the .NET runtime to be installed on the Linux machine.)
 
Then click on Publish.
 
This created a folder under Release/netcoreapp3.0/publish
 
I copied these files onto my Linux machine. Here are the important ones:
total 68
drwxr-xr-x  2 jonathan jonathan  4096 Mar 12 19:27 .
drwxr-xr-x 64 jonathan jonathan  4096 Mar 12 19:35 ..
-rwx------  1 jonathan jonathan   431 Jul  2  2020 CSVComparison.deps.json
-rwx------  1 jonathan jonathan 14336 Jul  2  2020 CSVComparison.dll
-rwx------  1 jonathan jonathan  4860 Jul  2  2020 CSVComparison.pdb
-rwx------  1 jonathan jonathan   154 Jul  2  2020 CSVComparison.runtimeconfig.json 
 

I've previously installed the .NET Core runtime on Ubuntu. As of the time of writing the installed version (dotnet --version) is 3.1.404.

The IMDB/movie_data.csv file is a 50000 row CSV I generated from the IMDB movie dataset. I had originally set this up for a machine learning exercise but it is also a good sized dataset to checkout the tool. I made two copies and edited one of the comments on the candidate file. Then, to run the CSV Comparison, I navigated to the folder containing the binaries and ran with this command-line:

dotnet ./CSVComparison.dll ../IMDB/movie_data2.csv ../IMDB/movie_data2.csv ../IMDB/movie_config.xml ./output

The output:

Reference: ./movie_data.csv
Candidate: ./movie_data2.csv
Saving results to output/ComparisonResults.csv
Finished. Comparison took 10517ms

And the result:

?xml version="1.0" encoding="utf-8"?>
<ComparisonDefinition xmlns:xsi="http://www.w3.org/2001/XMLSchema-instance" xmlns:xsd="http://www.w3.org/20
01/XMLSchema">
  <Delimiter>,</Delimiter>
  <KeyColumns>
    <Column>row</Column>
  </KeyColumns>
  <HeaderRowIndex>0</HeaderRowIndex>
  <ToleranceValue>0.1</ToleranceValue>
  <IgnoreInvalidRows>false</IgnoreInvalidRows>
  <ToleranceType>Relative</ToleranceType>
  <ExcludedColumns />
</ComparisonDefinition>

Date run: 22/03/2021 18:40:12
Reference: ./movie_data.csv
Candidate: ./movie_data2.csv
Number of Reference rows: 50001
Number of Candidate rows: 50001
Comparison took 10517ms
Number of breaks 1

Break Type,Key,Column Name,Reference Row, Reference Value, Candidate Row, Candidate Value
ValueMismatch,7230,review,96,"Exceptional movie that handles a theme of

Tuesday, 2 March 2021

Time for some Maths

While tidying up my old University Maths notes the other day I came across this problem. (I didn't get it right first time round!)

It's quite interesting and I thought I'd also use the opportunity to setup nice looking maths on the blog. So, the question:

Find the first two terms of the series for tanx in powers of x.

Now, 

$$tanx=\frac{sinx}{cosx}$$

and the power series expansions of sinx and cosx begin as:

$$sinx=x-\frac{x^3}{3!}+\frac{x^5}{5!}+...$$

$$cosx=1-\frac{x^2}{2!}+\frac{x^4}{4!}+...$$

Put this together:

$$tanx=\frac{x-\frac{x^3}{6}+...}{1-\frac{x^2}{2}+...}$$

Multiply by $\frac{1+\frac{x^2}{2}}{1+\frac{x^2}{2}}$ (This is just multiplying by 1 and chosen so we can deal with the $x^2$ term in the denominator), so:

$$tanx=\frac{(1+\frac{x^2}{2})(x-\frac{x^3}{6}+...)}{(1+\frac{x^2}{2})(1-\frac{x^2}{2}+...)}$$

If we now just multiply out the first term we get

$$tanx=\frac{x+\frac{x^3}{2}-\frac{x^3}{6}+...}{1+\frac{x^2}{2}-\frac{x^2}{2}+...}$$

$$tanx=\frac{x+\frac{x^3}{3}+...}{1+...}$$

The other terms in $x^4$ and $x^5$ can be ignored, giving:

$$tanx=x+\frac{x^3}{3}+...$$


To display the formulae I've added MathJax to the blog. 

Go to Theme then from the Customise dropdown select Edit HTML. Add the following just below the <head> element:


Finally, here's a useful link: MathJax basic tutorial and quick reference - Mathematics Meta Stack Exchange


Thursday, 18 February 2021

Setting up a Minecraft Mod project using Eclipse


Here's some instructions how to setup a new Mod project for Minecraft Java using Eclipse. It's really so I can remember how to do this in future!

First, I built spigot. The instructions are here: https://www.spigotmc.org/wiki/buildtools/ (I built spigot_1.16.5.jar Windows)

There's a whole world of exploring to do around setting up Minecraft servers, let alone playing the game and I can't do it justice here. Needless to say, I'm making the assumption you already know how to run a Minecraft server locally.

Now, to create the project follow these steps:

  1. Open Eclipse
  2. Select File -> New -> Java Project
  3. In the Dialog, enter the name of the project, MinecraftMod, say, and click Next 
  4. Select the Libraries tab on the next Dialog then select Add External JARS... Add the spigot jar built earlier


  5. Click on Finish
  6. Select File -> New -> Class
  7. In the Dialog, enter com.javaminecraft into the Package field, the Name of the Mod into the Name field and make sure the main method stub is unchecked
  8. Click Finish
  9. Enter the Java code for the Mod (I won't tell you what to write here!)
  10. We now need to create the plugin.yml. Select File -> New -> File
  11. Call the file plugin.yml
  12. Make sure the Parent Folder is the name of the project, MinecraftMod in this case
  13. Enter the yaml required for the Mod (again, not for this blog)
  14. To be able to add to the Minecraft server we need to export as a JAR. Right-click on the Project name and click on Export...
  15. Select Java -> JAR File

  16. The export destination will be the Minecraft plugins folder for the server
  17. Restart the Minecraft server

There. Hopefully this is a simple recipe for setting up from scratch.

Thursday, 31 December 2020

LED Firelight for Harry Potter

It's Lego Harry Potter, but I thought it would be fun to light up the great hall with LEDs setup to flicker like firelight 

I took three LEDs, one red and two yellow and wired them up on a breadboard as below


I used a 1KΩ resistor for each LED, connecting to Digital Pins 9, 10 and 11 on the Arduino.

Here's the Arduino script:
The analogWrite() call sets up Pulse Width Modulation (PWM). This is a square wave with a varying duration of "on" time, known as the pulse width or duty cycle. PWM can be used to simulate a range of voltages between 0 and 5V.

The value of the duty cycle is given to the analogWrite call. 0 is always off, 255 is always on. In this example, the minimum is set to at least 55 (about 20%) and a random amount up to the maximum is overlaid. 

The value is changed every 100ms to give a flicker-like effect.

Next, I replaced the breadboard by soldering the components onto 30-40cm long wires. Covered the bare wire with electrical tape and put the LEDs into the fireplace of the Lego Harry Potter Hogwarts Great Hall.

Here it is after dark...  Lego Harry Potter LED Great Hall Fireplace - YouTube


Tuesday, 3 November 2020

Setting up a Raspberry Pi (2020 Edition)

It's been a while since I setup a new Raspberry Pi from scratch. My Raspberry Pi 2 was running an old version of Raspbian Jessie which was no longer getting updates. In particular the version of Chromium was old. So I decided to update to the latest version.

It's now called Raspberry Pi OS and after downloading from here I tried to reflash the old SD card.

This is where it got a bit tricky...

First, Windows didn't recognise the SD, to the extent that I couldn't even reformat. I switched to Linux. I used DiskUtil to reformat it. At this point I thought it would be quick to use the Raspberry Pi Image Utility to install the OS but when I tried it failed with: Unspecified Libcurl Error 

So back to Windows which was able to open the SD but required another (quick) format and finally I was able to use Etcher to flash the card.

Phew. That was more work than it should have been. 

At this point I popped the SD card back in the Raspberry Pi, plugged it into the TV and started up

The process is a bit more streamlined than before. Connecting the Wifi and changing the password is covered by a Wizard.

The Wizard finally asked if I wanted to update the software on the Pi. I answered yes to this but the process ended up crashing. I resorted to the old method of running sudo apt-get update followed by sudo apt-get upgrade from a terminal

Next, from the terminal, enter sudo raspi-config. Select the Advanced Options and Expand Filesystem. This ensures the whole of the SD card is available to the Pi.

In the same tool, enable SSH and VNC. This is because I want to remotely logon to the machine from elsewhere on my network.

The next step was to give the machine a Static IP address on the home network. This just makes things easier for me to manage.

To do this edit /etc/dhcpcd.conf and add the following lines to the bottom, assuming the router IP is 192.168.0.1 and we want to setup our static IP to 129.168.0.200

   interface wlan0

   static ip_address=192.168.0.200/24

   static routers=192.168.0.1

   static domain_name_servers=192.168.0.1

Oh no this didn't work at all. I rebooted and was still allocated the dynamic IP address from the router. I went round a lot of circles and visited a lot of websites trying to resolve this, including disabling IPV6.

These proved useful:

  • ip a  : To see your IP Address
  • systemctl status dhcpcd.service : To see the status of dhcpcd

But in the end the solution was to open raspi-config and disable Predicable Network Interface Names

I also added noipv6rs after interface wlan0 in dhcpcd.conf but I don't think that is required. 

Network Share

Connect to the network share automatically on start up. Add the following to the end of /etc/fstab

  //ip.of.nas/Public /home/pi/NAS cifs guest 0 0

TouchScreen

The 7 inch touch screen was setup with the following commands

  git clone https://github.com/goodtft/LCD-show.git

  chmod -R 755 LCD-show

  cd LCD-show/

  sudo ./LCD5-show

Then reboot. No additional calibration was required 

Chromium

The default chromium is taken from the chromium-browser package. This has special optimisations for the Raspberry Pi but is not updated frequently. However the latest Debian chromium package can be installed which is perfect for my use case.

Monday, 12 October 2020

Eclipse and Windows 8.1 family accounts

OK this is a bit niche, but I think worth recording. 

I have a Windows 8.1 account setup with Family Security. What I wanted to do was install Eclipse on this account so the children could play with writing Java code, for Minecraft Mods.

This proved to be tricky. The Eclipse installer uses Oomph which didn't work too well in this use case:

1. Install on family account normally. This failed because underlying processes asked for access one at a time. When a process asks for access, even if it is provided, it then terminates. You can end up repeating this a lot of times but in this case even that didn't work.

2. Install on Admin account. I hoped it would then be available to all users. Unfortunately, the Eclipse installation saves files to the user area for the Administrator.

3. Install on family account as Administrator. Open a command prompt as administrator and run the setup. This fails because it still saves the files to the Administrator user area even though it's run from the family account

So my solution after attempt #3 was to copy all the files from the Administrator User folder to the Family account user folder. Most important was to copy the .p2 folder.

I then manually edited the following files from the .p2 folder to point to the new location:

  • eclipse.ini
  • configuration\config.ini
  • configuration\org.eclipse.equinox.simpleconfigurator\bundles.info
  • configuration\org.eclipse.update\platform.xml

After this I was able to open the IDE and run a simple Hello, World!