Wednesday, 6 September 2017

Fixing Linux Mint WiFi

With Windows 10 completely breaking in a fresh and exciting (not to mention unfixable) way on a laptop earlier in the year I decided to wipe it and install Linux Mint

This was all very straightforward but as the laptop in question is a 6 year old Dell to get the WiFi working I needed to install a new driver.

From the Ubuntu wiki the command:

lspci -vvnn | grep -A 9 Network

Gave this output:
 
Network controller [0280]: Broadcom Corporation BCM4312 802.11b/g LP-PHY [14e4:4315] (rev 01)

4315 is not listed in the above link but using this successfully got the WiFi working:

sudo apt-get install firmware-b43-installer

Now, all this worked very well for some weeks until after a restart the WiFi decided not to connect at all.

I looked at the logs from

cat /var/log/syslog

Sep  5 20:42:27 jonathan-Inspiron-1764 avahi-daemon[926]: Registering new address record for fe80::9a27:20f7:ee67:8a6a on wlan0.*.
Sep  5 20:42:28 jonathan-Inspiron-1764 dhclient[5211]: DHCPDISCOVER on wlan0 to 255.255.255.255 port 67 interval 5 (xid=0x600e0419)
Sep  5 20:42:33 jonathan-Inspiron-1764 dhclient[5211]: DHCPDISCOVER on wlan0 to 255.255.255.255 port 67 interval 11 (xid=0x600e0419)
Sep  5 20:42:44 jonathan-Inspiron-1764 dhclient[5211]: DHCPDISCOVER on wlan0 to 255.255.255.255 port 67 interval 18 (xid=0x600e0419)
Sep  5 20:43:02 jonathan-Inspiron-1764 dhclient[5211]: DHCPDISCOVER on wlan0 to 255.255.255.255 port 67 interval 16 (xid=0x600e0419)
Sep  5 20:43:10 jonathan-Inspiron-1764 NetworkManager[940]: <warn>  [1504640590.6173] dhcp4 (wlan0): request timed out
Sep  5 20:43:10 jonathan-Inspiron-1764 NetworkManager[940]: <info>  [1504640590.6174] dhcp4 (wlan0): state changed unknown -> timeout
Sep  5 20:43:10 jonathan-Inspiron-1764 NetworkManager[940]: <info>  [1504640590.6338] dhcp4 (wlan0): canceled DHCP transaction, DHCP client pid 5211
Sep  5 20:43:10 jonathan-Inspiron-1764 NetworkManager[940]: <info>  [1504640590.6338] dhcp4 (wlan0): state changed timeout -> done
Sep  5 20:43:10 jonathan-Inspiron-1764 NetworkManager[940]: <info>  [1504640590.6345] device (wlan0): state change: ip-config -> failed (reason 'ip-config-unavailable') [70 120 5]
Sep  5 20:43:10 jonathan-Inspiron-1764 NetworkManager[940]: <info>  [1504640590.6350] manager: NetworkManager state is now DISCONNECTED

Strangely, this seemed to be a symptom of not using the b43 driver. So I decided to try the following:
  • Connect to router by ethernet and update
  • sudo apt-get remove firmware-b43-installer 
  • sudo apt-get install firmware-b43-installer
  • Reboot
This worked and I've been able to post this blog from the now Minty fresh (sorry!) laptop.

Tuesday, 23 May 2017

Birdbox cam odds and ends


Unfortunately, although I did get a few visitors, including Wrens to the Birdbox, none of them decided to setup a nest.


However, I did make a few changes to make life simpler for me. First off, using an old router made life harder than necessary when transferring files or viewing the video output. I played with setting up a network bridge but this proved to be too problematic.
The simple solution was to buy a Wi-Fi Range extender with an Ethernet port. This allowed me to seamlessly add the Pi on the Power over Ethernet to my main home network.


Next, the image processing code used by the motion detection requires the camera output to a device on /dev/video0

This is not setup automatically so to setup the driver enter the following:

sudo modprobe bcm2835-v4l2

To do this automatically after every boot, add the following two lines to the end of the /etc/modules file.

# /etc/modules: kernel modules to load at boot time.
#
# This file contains the names of kernel modules that should be loaded
# at boot time, one per line. Lines beginning with "#" are ignored.
# Parameters can be specified after the module name.

snd-bcm2835

# v4l2 driver for Rasberry Pi Cam
bcm2835-v4l2


To copy files between the pi and laptop. I used scp

tar -cvf images.tar *.jpg
scp images.tar username@destination.ip:images.tar
tar -xvf images.tar

And finally, to measure the temperature of CPU. Interesting both in the cold winter nights and hot summer days

/opt/vc/bin/vcgencmd measure_temp


Thursday, 20 April 2017

Improving the Windows Photo Screensaver

Way back in 2011 I decided to setup the laptop screensaver to show my photos. The problem with this was although I had around 10,000 or so photos, the screensaver in shuffle mode was apparently using a random seed based on the photo folder properties. This meant I only saw the same photos, at least until I'd added or removed some.

( I have no idea if the latest incarnation on Windows 10 uses a time-based seed now, mainly because my own one has worked for me without a hitch for the last 6 years)

As you can guess, I wasn't particularly impressed with this so I decided to write my own photo display screensaver.

I wanted to write this using .NET and WPF so I first created a Window with 3 vertical columns. The reason for this was because I wanted portrait photos to be centered. The XAML is something like this.

<Window x:Class="WPFScreenSaver.PhotoScreenSaver"
    Title="PhotoScreenSaver" WindowStyle="None"

    WindowState="Maximized" ResizeMode="NoResize"
    Loaded="OnLoaded" Cursor="None" KeyDown="PhotoStack_KeyDown" 

    MouseDown="PhotoStack_MouseDown"
    MouseMove="PhotoStack_MouseMove" >
    <Grid Name="ImageGrid" Background="Black">
        <Grid.ColumnDefinitions>
            <ColumnDefinition Name="Col1"/>
            <ColumnDefinition/>
            <ColumnDefinition Name="Col2"/>
        </Grid.ColumnDefinitions>
        <Image Name="ScreenImage" Stretch="Uniform" Grid.Column="1"/>
    </Grid>
</Window>


Note the KeyDown, MouseDown and MousrMove events are used to detect motion to stop the screensaver. In the code behind these call Application.Current.Shutdown(); to kill the screensaver.

The WindowStyle, WindowState and ResizeMode properties ensure the window fills the whole screen, especially on top of the Taskbar.

In the PhotoScreenSaver constructor, I run a file discovery step to obtain a list of all the filenames of files with .jpg extension from a root folder. (This root folder is stored in the Registry)

Then I create a new Random instance. This has a seed based on the current time.

A Timer is setup with callback to a method to ShowNextImage.

It's important to note here that the timer callback is not on the main UI thread which means we won't be able to update the image so we need to use Dispatcher to invoke it on that thread

if (this.Dispatcher.Thread != Thread.CurrentThread)
{

    this.Dispatcher.Invoke(new Action<Object>(ShowNextImage), new object[] { stateInfo });
}


I obtain an index to file to show using the random number generator. NextDouble returns a double between 0.0 and 1.0 so I can use this to multiply by the number of images to get an index.

var index = RandomGenerator.NextDouble() * imageFileCount;
var filename = ImageFiles[(int)index];

I don't worry about rounding since it's not really a problem if I get ImageFiles[7689] or ImageFiles[7688]

The image itself is loaded as a BitmapImage. This is then scaled to fit the screen.

To turn this from a photo display app into a fully fledged screensaver we need to do some work with the Application startup. In App.xaml we need to change Startup to point to our own startup method

<Application x:Class="WPFScreenSaver.App"
    xmlns="http://schemas.microsoft.com/winfx/2006/xaml/presentation"
    xmlns:x="http://schemas.microsoft.com/winfx/2006/xaml"
    Startup="OnStartup"
    >
    <Application.Resources/>
</Application>


The OnStartup in the code-behind class does two things. First it reads the command line arguments and second shows either the screensaver, a settings window or a preview. The arguments are:
  • /c  Show the settings dialog
  • /p Show a preview (I just call Shutdown for this)
  • /s or no argument, show the screensaver window
The last step to display the photo window I've just updated (and hence the blog!) Mainly because the original implementation didn't work with two monitors. I now enumerate each screen, determine its dimensions and create the photo window accordingly.

foreach (System.Windows.Forms.Screen screen in System.Windows.Forms.Screen.AllScreens)
{
    PhotoScreenSaver window = new PhotoScreenSaver();
    window.WindowStartupLocation = WindowStartupLocation.Manual;
    System.Drawing.Rectangle location = screen.Bounds;
  
    // Set window position and size
    window.Left = location.X;
    window.Top = location.Y;
    window.Width = location.Width;
    window.Height = location.Height;

    // Tip, if this isn't the primary window and you set
    // window.WindowState = WindowState.Maximized;
    // Before the window has been generated, it'll maximise into the primary
    // In any case, using normal seems fine.
    window.WindowState = WindowState.Normal;
}

//Show the windows
foreach (Window window in System.Windows.Application.Current.Windows)
{         
    window.Show();
}

The windows are entirely independent. I can improve this by sharing the ImageFiles list between the two and synchronising the updates but it really works quite nicely as it is.

Finally, after building the exe, to turn into a screensaver rename to Screensaver.scr. After this, you can right-click on the .scr file and select install.

Thursday, 9 March 2017

Bird Motion Detector

It was pointed out to me that while live streaming was very impressive, a view of an empty box wasn't answering any questions about whether it was getting visited.

The solution was to set-up motion detection and save still images whenever something happened.

The code is based on the Image processing tutorial here.

By installing the libraries, you get a Camera object that you can use to quickly grab and manipulate images. Import it using the imgproc library.

The motion detector code can then be build using a small python file: 

import subprocess
from imgproc import *

cam = Camera(320, 240)
continue_processing = True

last_frame_colour = 0
index = 1
savecount = 0
threshold = 40

try:
    while continue_processing:
        average_red = 0
        average_green = 0
        average_blue = 0

        image = cam.grabImage()
        
        total_red = 0
        total_green = 0
        total_blue = 0
       
        # Only check central 40 x 40 box  
        pixel_count = 1600

        for x in range(140, 180):
            for y in range(100, 140):
                red, green, blue = image[x,y]
                total_red += red
                total_green += green
                total_blue += blue

        # average rgb per pixel
        average_red = total_red / pixel_count
        average_green = total_green / pixel_count
        average_blue = total_blue / pixel_count

        frame_colour = average_red + average_green + average_blue

        filename = "image" + str(index) + ".jpg"
                
        if frame_colour > last_frame_colour + threshold:
            del cam
            subprocess.call(["raspistill", "-o", filename])
            savecount += 1
            cam = Camera(320, 240)
       
        if frame_colour < last_frame_colour - threshold:
            del cam
            subprocess.call(["raspistill", "-o", filename])
            savecount += 1
            cam = Camera(320, 240)

        if savecount > 20:
            continue_processing = False

        last_frame_colour = frame_colour

        index += 1

finally:
    print "Finished"


 The code does the following
  1. Create a fairly low resolution camera 320x240 pixels
  2. Enter a loop and grab an image  image = cam.grabImage()
  3. Take the pixels in the central 40x40 box and build up a representative average colour
  4. Compare this with the average from the previous iteration. If the difference exceeds a threshold, in this case set at 40 after some experimentation, then take a still image
  5. To save the still I call out to raspistill using subprocess. The problem here is I need to kill the Camera running the detection. Unfortunately at this point I've called del on that object, which doesn't really play nicely with python and Garbage collection. This is certainly something to improve in future.
  6. Finally, I set a limit of saving 20 images before exiting the loop. This is a conservative limit intended to prevent the SD card filling up. The images are just named with an index based on the iteration through the loop. Again something more sophisticated would improve things here.
I wanted to run this process continuously while I'm not logged on so I used the  following command:

nohup python BirdDetector.py > /dev/null &
  • nohup keeps the process running even after logging out of the session
  • & runs the process in the background
  • > /dev/null redirects the output to the null device
So, did I detect a bird?

Yes!

Was the bird (A great tit) concerned about being spied on?

Who knows!

Thursday, 23 February 2017

LeapMotion Robot controller

Sometimes impulse takes over and I end up buying something that seems really cool but in the cold light of day doesn't quite live up to its promise

In this case, about two years, I bought a LeapMotion controller.

The premise seemed great, a way of using hand gestures to intuitively control your computer. It seemed especially promising given the controller could track hand and finger positions for both hands. Unfortunately, my old laptop didn't have a good enough spec to do anything more than the most basic samples and even then the experience seemed too prone to errors.

The new laptop certainly has enough power but even now the tracking sometimes seems to get the jitters. So it seemed like this piece of kit was destined to lie in a cupboard like so many other pieces of technology around the world.

But cometh the hour, cometh the robot-arm and it occurred to me LeapMotion would make for an interesting control interface.

Starting simply, my intention was to control the open and shut movement of the grabber with my index finger and thumb. By moving them apart and together I hoped to get the grabber to follow this motion.

To begin I downloaded the LeapMotion 2.3.1 SDK. Using Eclipse, I created a new Java application and added LeapJava.jar (Right-click on the project, select Properties -> Java Build Path -> Libraries Tab and Add External Jars, so that it appeared in the project:


To access the tracking data I created a class that implemented the com.leapmotion.leap.Listener interface and added this to a Controller

  LeapMotionListener listener = null;
  Controller controller = new Controller();

  try
  {
   listener = new LeapMotionListener( writer, new TcpClient() );

   controller.addListener(listener);
   System.out.println("Press Enter to quit...");
   System.in.read();
  }
  catch( Exception e)
  {
   e.printStackTrace();
  }
  finally
  {
   if (listener != null)
   {
    controller.removeListener(listener);
   }

  }


In the Listener class I implemented onConnect and onFrame. The interesting implementation was onFrame. This is called in a separate thread every time data is sampled. The event details can be obtained with a Frame instance

@Override
 public void onFrame(Controller controller) {

    Frame frame = controller.frame();

The API then quite nicely allows you to obtain the information about the index finger and thumb in the shape of LeapMotion Vectors:

FingerList indexFingerList = frame.fingers().fingerType(Finger.Type.TYPE_INDEX);
Finger indexFinger = indexFingerList.get(0); //since there is only one per hand. I'm only holding  one hand in the field of view

FingerList thumbList = frame.fingers().fingerType(Finger.Type.TYPE_THUMB);
Finger thumb = thumbList.get(0);

Vector thumbTip = thumb.tipPosition();
Vector indexTip = indexFinger.tipPosition();


At this point I started investigating the behaviour of the sensor. Calculating the distance between finger and thumb is simple:

final float distance = thumbTip.distanceTo(indexTip);

Unfortunately this measure is too noisy to be able to reliably control the arm. So I decided on a velocity measure:

v = delta (distance) / delta (time)

If the velocity exceeded a threshold then the signal to drive the motor in the appropriate direction would be sent.

I setup the robot arm and Arduino as per my earlier blog; replacing the Android app with this LeapMotion client.

This is certainly a work in progress. For one the velocity is still a bit noisy. Also the motor being a simple DC motor is setup to only work at one speed. Finally, if the controller lost tracking of the hand the motor was left in the last known state. I'll add post in future to address some of these problems and make the source available on GitHub.

Saturday, 26 November 2016

Completed Bird Box Camera

Last time I set-up a Raspberry Pi running from Power over Ethernet. So now I knew I could connect to the machine remotely, I could proceed with setting up the camera.

As I was going to install the camera in the bird box, there was not going to be much light available. Setting up a visible LED would likely be a big deterrent for birds, given that the box would be glowing brightly! So I decided to use a NoIR camera with an IR LED for illumination. The camera was installed as per normal and I set-up the live stream previously used for the remote robot arm

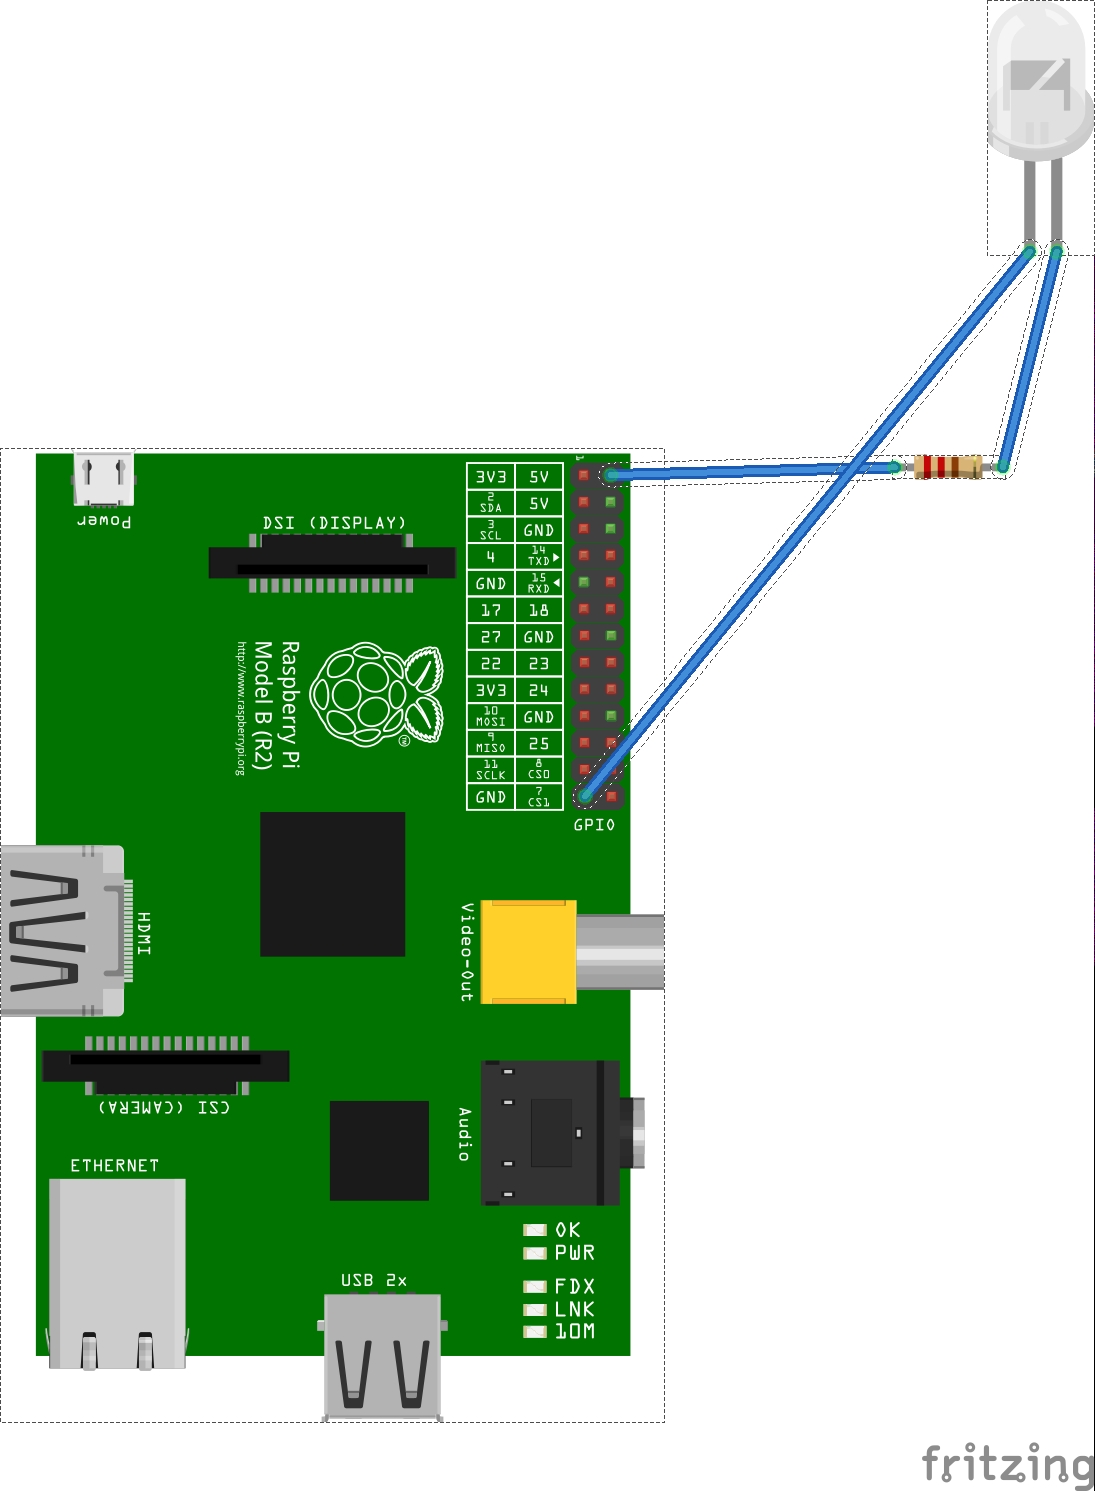
I bought some 850nm IR LEDs. You can't just wire these up directly to the 5v pin on the GPIO port otherwise they will burn out. To prevent this happening you need to add a resistor.

To calculate the value of resistor use the formula, R = V/I

V is the source voltage minus the forward voltage, or voltage drop over the resistor, and I is the forward current of the LED. The resistor should limit current to at or below this current.

For these, the forward voltage was quoted as 1.5V and current as 100mA so R is:


R = ( 5V – 1.5V ) / ( 100mA x 1000 )
 R = 35 Ohm

We multiply by 1000 because the LED current is quoted in units of milliamps.

The nearest resistor I had to this was 39 Ohms, so this was put in place. A larger resistor would result in smaller current across the LED so this was OK.

Because I was happy for the LED to be powered 24 x 7, I connected this to the 5v and ground pins on the Raspberry Pi GPI.


(As an aside, I practised setting up the LEDs first with an Arduino, it turns out mobile phone cameras have some sensitivity to IR light so looking at the LED in preview mode on the camera was a quick way of telling if it was working or not.)

Focussing the camera proved to be difficult. The camera is a fixed focus and so the distances involved here (10-20 cm inside the box) are too small for a sharp focus.
The lens however can be unscrewed with great care and there are some pages on the web that describe how to do this. I can only say this is an incredibly fiddly operation, so fiddly in fact that the first time I tried I ended up scratching the lens and I had to buy a new camera.

Fortunately, the new one came with a very handy widget that allows you to change the focus very easily:


Of course, setting up components in a nice an clean desktop setting is one thing, squeezing the Pi and POE into a small tupperware box and ensuring the cables were not catching was quite another especially when space was at a premium.

The last tricky bit was positioning the camera at an angle to the underside of the box roof so that it would point straight down. I succeeded with a piece of cardboard shaped into a wedge.

Here is the completed bird box, without full waterproofing:


The view of the inside is pretty good:


The box is now waterproofed and out in the garden, on the end of a 30m cable. I don't really expect to see much activity given it's winter but it'll be good to run for a few days or weeks to check out how well it's been put together and make repairs if necessary.

Monday, 10 October 2016

Taking Raspberry Pi outside


Last spring a pair of wrens moved into a bird box in the garden and they managed to successfully raise 6 chicks. While this was wonderful to watch from a distance, I thought it would be an interesting project for next season to use a Raspberry Pi and NOIR camera to be able to see what's going on inside.

Incidentally, I learned that when Wrens fledge, they don't so much fly the nest, as tumble from the nest..


Step 1: This post considers the problem of getting the Raspberry Pi camera to the bird box.

I decided on two requirements:

1. I don't want to power it from battery packs, I anticipate keeping everything running for a significant time and I don't want to disturb the birds during nesting.
2. The Pi will be outside the range of my WiFi so communication will need to be wired.

It seemed that using Power over Ethernet would satisfy both these considerations.

I used a TPLink Power over Ethernet kit to inject and split the power. My old NetGear router was dusted down for testing this.

The output power cable had a 5.5x2.1mm Jack, so I needed a converter for the micro USB Raspberry Pi power socket.

The splitter has a switch for 3 different voltages. It's important to set this to 5V for the Raspberry Pi input.
This is what the prototype looked like with some old cables I had.

The Raspberry Pi switched over to wired network and disabled the WiFi on startup. It was simple to point my laptop at the old network and open a session using PuTTY.

Next I will get a longer cable that's suitable for running outdoors. The problem of attaching this to the bird box will be covered in a future post.