Thursday, 9 March 2017

Bird Motion Detector

It was pointed out to me that while live streaming was very impressive, a view of an empty box wasn't answering any questions about whether it was getting visited.

The solution was to set-up motion detection and save still images whenever something happened.

The code is based on the Image processing tutorial here.

By installing the libraries, you get a Camera object that you can use to quickly grab and manipulate images. Import it using the imgproc library.

The motion detector code can then be build using a small python file: 

import subprocess
from imgproc import *

cam = Camera(320, 240)
continue_processing = True

last_frame_colour = 0
index = 1
savecount = 0
threshold = 40

try:
    while continue_processing:
        average_red = 0
        average_green = 0
        average_blue = 0

        image = cam.grabImage()
        
        total_red = 0
        total_green = 0
        total_blue = 0
       
        # Only check central 40 x 40 box  
        pixel_count = 1600

        for x in range(140, 180):
            for y in range(100, 140):
                red, green, blue = image[x,y]
                total_red += red
                total_green += green
                total_blue += blue

        # average rgb per pixel
        average_red = total_red / pixel_count
        average_green = total_green / pixel_count
        average_blue = total_blue / pixel_count

        frame_colour = average_red + average_green + average_blue

        filename = "image" + str(index) + ".jpg"
                
        if frame_colour > last_frame_colour + threshold:
            del cam
            subprocess.call(["raspistill", "-o", filename])
            savecount += 1
            cam = Camera(320, 240)
       
        if frame_colour < last_frame_colour - threshold:
            del cam
            subprocess.call(["raspistill", "-o", filename])
            savecount += 1
            cam = Camera(320, 240)

        if savecount > 20:
            continue_processing = False

        last_frame_colour = frame_colour

        index += 1

finally:
    print "Finished"


 The code does the following
  1. Create a fairly low resolution camera 320x240 pixels
  2. Enter a loop and grab an image  image = cam.grabImage()
  3. Take the pixels in the central 40x40 box and build up a representative average colour
  4. Compare this with the average from the previous iteration. If the difference exceeds a threshold, in this case set at 40 after some experimentation, then take a still image
  5. To save the still I call out to raspistill using subprocess. The problem here is I need to kill the Camera running the detection. Unfortunately at this point I've called del on that object, which doesn't really play nicely with python and Garbage collection. This is certainly something to improve in future.
  6. Finally, I set a limit of saving 20 images before exiting the loop. This is a conservative limit intended to prevent the SD card filling up. The images are just named with an index based on the iteration through the loop. Again something more sophisticated would improve things here.
I wanted to run this process continuously while I'm not logged on so I used the  following command:

nohup python BirdDetector.py > /dev/null &
  • nohup keeps the process running even after logging out of the session
  • & runs the process in the background
  • > /dev/null redirects the output to the null device
So, did I detect a bird?

Yes!

Was the bird (A great tit) concerned about being spied on?

Who knows!

Thursday, 23 February 2017

LeapMotion Robot controller

Sometimes impulse takes over and I end up buying something that seems really cool but in the cold light of day doesn't quite live up to its promise

In this case, about two years, I bought a LeapMotion controller.

The premise seemed great, a way of using hand gestures to intuitively control your computer. It seemed especially promising given the controller could track hand and finger positions for both hands. Unfortunately, my old laptop didn't have a good enough spec to do anything more than the most basic samples and even then the experience seemed too prone to errors.

The new laptop certainly has enough power but even now the tracking sometimes seems to get the jitters. So it seemed like this piece of kit was destined to lie in a cupboard like so many other pieces of technology around the world.

But cometh the hour, cometh the robot-arm and it occurred to me LeapMotion would make for an interesting control interface.

Starting simply, my intention was to control the open and shut movement of the grabber with my index finger and thumb. By moving them apart and together I hoped to get the grabber to follow this motion.

To begin I downloaded the LeapMotion 2.3.1 SDK. Using Eclipse, I created a new Java application and added LeapJava.jar (Right-click on the project, select Properties -> Java Build Path -> Libraries Tab and Add External Jars, so that it appeared in the project:


To access the tracking data I created a class that implemented the com.leapmotion.leap.Listener interface and added this to a Controller

  LeapMotionListener listener = null;
  Controller controller = new Controller();

  try
  {
   listener = new LeapMotionListener( writer, new TcpClient() );

   controller.addListener(listener);
   System.out.println("Press Enter to quit...");
   System.in.read();
  }
  catch( Exception e)
  {
   e.printStackTrace();
  }
  finally
  {
   if (listener != null)
   {
    controller.removeListener(listener);
   }

  }


In the Listener class I implemented onConnect and onFrame. The interesting implementation was onFrame. This is called in a separate thread every time data is sampled. The event details can be obtained with a Frame instance

@Override
 public void onFrame(Controller controller) {

    Frame frame = controller.frame();

The API then quite nicely allows you to obtain the information about the index finger and thumb in the shape of LeapMotion Vectors:

FingerList indexFingerList = frame.fingers().fingerType(Finger.Type.TYPE_INDEX);
Finger indexFinger = indexFingerList.get(0); //since there is only one per hand. I'm only holding  one hand in the field of view

FingerList thumbList = frame.fingers().fingerType(Finger.Type.TYPE_THUMB);
Finger thumb = thumbList.get(0);

Vector thumbTip = thumb.tipPosition();
Vector indexTip = indexFinger.tipPosition();


At this point I started investigating the behaviour of the sensor. Calculating the distance between finger and thumb is simple:

final float distance = thumbTip.distanceTo(indexTip);

Unfortunately this measure is too noisy to be able to reliably control the arm. So I decided on a velocity measure:

v = delta (distance) / delta (time)

If the velocity exceeded a threshold then the signal to drive the motor in the appropriate direction would be sent.

I setup the robot arm and Arduino as per my earlier blog; replacing the Android app with this LeapMotion client.

This is certainly a work in progress. For one the velocity is still a bit noisy. Also the motor being a simple DC motor is setup to only work at one speed. Finally, if the controller lost tracking of the hand the motor was left in the last known state. I'll add post in future to address some of these problems and make the source available on GitHub.

Saturday, 26 November 2016

Completed Bird Box Camera

Last time I set-up a Raspberry Pi running from Power over Ethernet. So now I knew I could connect to the machine remotely, I could proceed with setting up the camera.

As I was going to install the camera in the bird box, there was not going to be much light available. Setting up a visible LED would likely be a big deterrent for birds, given that the box would be glowing brightly! So I decided to use a NoIR camera with an IR LED for illumination. The camera was installed as per normal and I set-up the live stream previously used for the remote robot arm

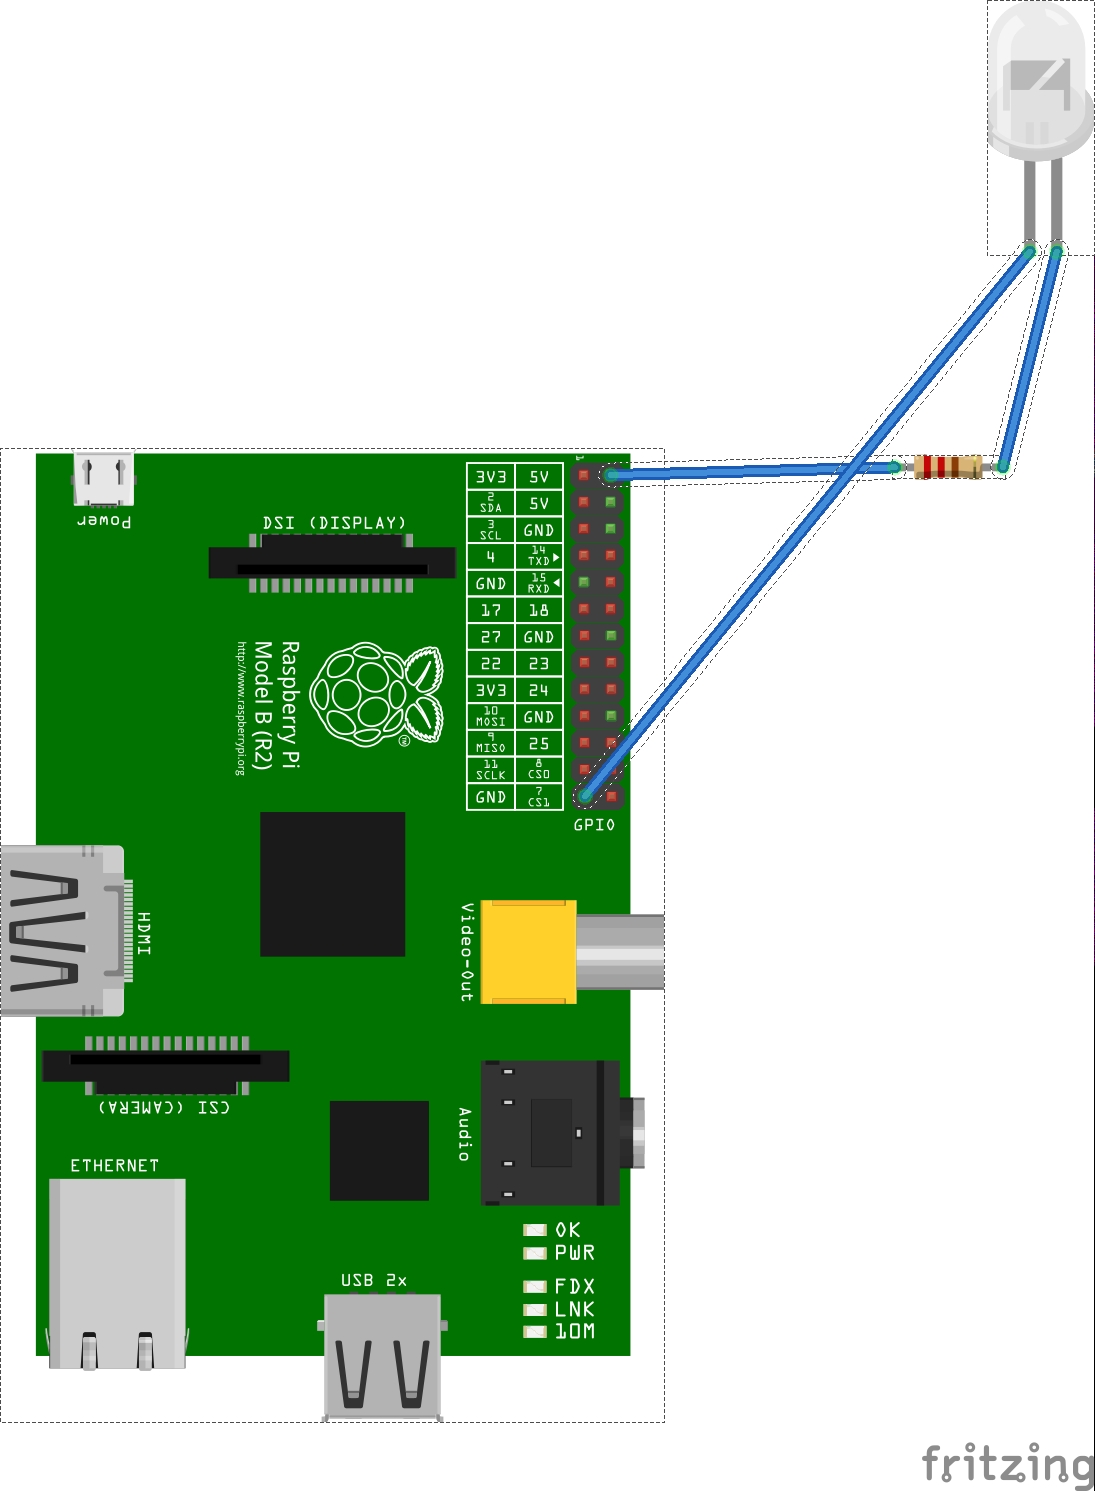
I bought some 850nm IR LEDs. You can't just wire these up directly to the 5v pin on the GPIO port otherwise they will burn out. To prevent this happening you need to add a resistor.

To calculate the value of resistor use the formula, R = V/I

V is the source voltage minus the forward voltage, or voltage drop over the resistor, and I is the forward current of the LED. The resistor should limit current to at or below this current.

For these, the forward voltage was quoted as 1.5V and current as 100mA so R is:


R = ( 5V – 1.5V ) / ( 100mA x 1000 )
 R = 35 Ohm

We multiply by 1000 because the LED current is quoted in units of milliamps.

The nearest resistor I had to this was 39 Ohms, so this was put in place. A larger resistor would result in smaller current across the LED so this was OK.

Because I was happy for the LED to be powered 24 x 7, I connected this to the 5v and ground pins on the Raspberry Pi GPI.


(As an aside, I practised setting up the LEDs first with an Arduino, it turns out mobile phone cameras have some sensitivity to IR light so looking at the LED in preview mode on the camera was a quick way of telling if it was working or not.)

Focussing the camera proved to be difficult. The camera is a fixed focus and so the distances involved here (10-20 cm inside the box) are too small for a sharp focus.
The lens however can be unscrewed with great care and there are some pages on the web that describe how to do this. I can only say this is an incredibly fiddly operation, so fiddly in fact that the first time I tried I ended up scratching the lens and I had to buy a new camera.

Fortunately, the new one came with a very handy widget that allows you to change the focus very easily:


Of course, setting up components in a nice an clean desktop setting is one thing, squeezing the Pi and POE into a small tupperware box and ensuring the cables were not catching was quite another especially when space was at a premium.

The last tricky bit was positioning the camera at an angle to the underside of the box roof so that it would point straight down. I succeeded with a piece of cardboard shaped into a wedge.

Here is the completed bird box, without full waterproofing:


The view of the inside is pretty good:


The box is now waterproofed and out in the garden, on the end of a 30m cable. I don't really expect to see much activity given it's winter but it'll be good to run for a few days or weeks to check out how well it's been put together and make repairs if necessary.

Monday, 10 October 2016

Taking Raspberry Pi outside


Last spring a pair of wrens moved into a bird box in the garden and they managed to successfully raise 6 chicks. While this was wonderful to watch from a distance, I thought it would be an interesting project for next season to use a Raspberry Pi and NOIR camera to be able to see what's going on inside.

Incidentally, I learned that when Wrens fledge, they don't so much fly the nest, as tumble from the nest..


Step 1: This post considers the problem of getting the Raspberry Pi camera to the bird box.

I decided on two requirements:

1. I don't want to power it from battery packs, I anticipate keeping everything running for a significant time and I don't want to disturb the birds during nesting.
2. The Pi will be outside the range of my WiFi so communication will need to be wired.

It seemed that using Power over Ethernet would satisfy both these considerations.

I used a TPLink Power over Ethernet kit to inject and split the power. My old NetGear router was dusted down for testing this.

The output power cable had a 5.5x2.1mm Jack, so I needed a converter for the micro USB Raspberry Pi power socket.

The splitter has a switch for 3 different voltages. It's important to set this to 5V for the Raspberry Pi input.
This is what the prototype looked like with some old cables I had.

The Raspberry Pi switched over to wired network and disabled the WiFi on startup. It was simple to point my laptop at the old network and open a session using PuTTY.

Next I will get a longer cable that's suitable for running outdoors. The problem of attaching this to the bird box will be covered in a future post.

Tuesday, 13 September 2016

Keeping cool

It's been a while since my last post, so it's time for a quick one to get back into the groove!

I finally caved into applying the Windows 10 upgrade on my old laptop just before the free period expired. This was mainly because the old one was being rendered slowly unusable.

The upgrade wasn't seamless, I had to download the full ISO image since there wasn't enough space for the default upgrade and had 2 false starts and roll-backs, but it succeeded in the end.

Credit where it's due, Microsoft have certainly improved disc management. The upgrade recognised the C: drive was small and did some sensible splitting of folders across that and the larger D: drive. The OS is also much faster than my old Windows 7 (although I'll give it time to clog up with updates before I definitively say it's better in that respect).

While this whole experience did push me over to Linux for my primary PC, I'm forced to use Windows for working from home.

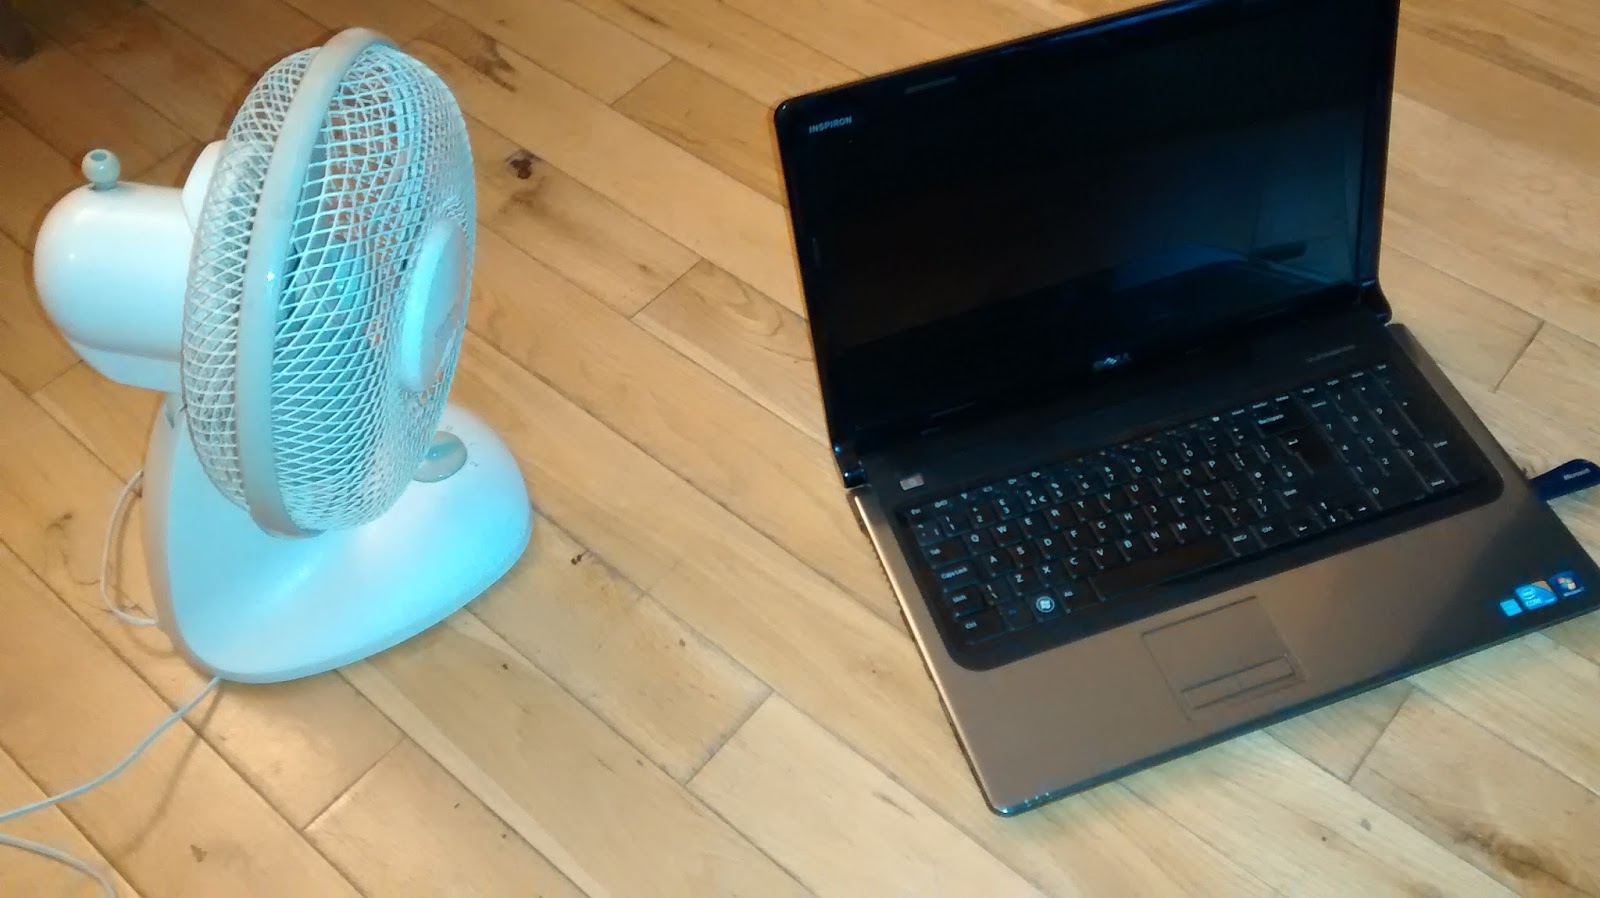
One not so nice new thing I've started experiencing is the laptop overheating. This can manifest in a couple of ways. First, the response of the machine slowly gets worse until it grinds to a halt and second, the machine just shuts down.

Now it's a fairly old machine so dust build-up could be a problem. I checked this first and the fan is running smoothly without any obvious blockages (I always have the laptop on a hard desk with plenty of space for ventilation). I haven't opened up though, so it's possible

This has also started happening since the Windows 10 upgrade. I have a feeling this might be exercising the hardware more than Windows 7 did but don't have any solid evidence. 

Finally, August and September have had some pretty hot days, 25 degrees C or more indoors, which is a high starting point for the laptop already.

The solution was simple!

The cooling effect is remarkable, and it works for me too.

(The recent focus on problems with Lithium Ion batteries made me wonder if the laptop battery was running any extra risk with this overheating so I took it out after one of the shut-down events. Fortunately the battery itself was pretty much still at room temperature so the management infrastructure looks like it's working well - I run off mains when working from home.)

Wednesday, 8 June 2016

Interference when driving motors on Arduino

Having bought a new DC motor, I wanted to set it running via the Raspberry Pi and Arduino motor shield in a similar way to previous Robot arm efforts.
I set up the Raspberry Pi to connect to the Arduino via USB and a Hub. Power for the motor was taken via an external battery pack, as shown below:


(I've recently discovered Fritzing which is a great tool for generating schematics, I downloaded the Linux version from here http://fritzing.org/download/ )

The driver code is based on earlier Robot arm code. It reads a character from a terminal on the Raspberry Pi and sends that to the Ardunio:

# Read characters from stdin and send to Arduino via serial
import termios, fcntl, sys, os, serial

arduino = serial.Serial('/dev/ttyACM0')
fd = sys.stdin.fileno()

oldterm = termios.tcgetattr(fd)
newattr = termios.tcgetattr(fd)
newattr[3] = newattr[3] & ~termios.ICANON & ~termios.ECHO
termios.tcsetattr(fd, termios.TCSANOW, newattr)

oldflags = fcntl.fcntl(fd, fcntl.F_GETFL)
fcntl.fcntl(fd, fcntl.F_SETFL, oldflags | os.O_NONBLOCK)

try:
    while 1: # This is a tight loop with high CPU
        try:
            c = sys.stdin.read(1)
            # repr() : Return a string containing a printable
            #    representation of an object
            arduino.write(c)
            print "Read character from stdin", repr(c)
        except IOError: pass
finally:
    termios.tcsetattr(fd, termios.TCSAFLUSH, oldterm)
    fcntl.fcntl(fd, fcntl.F_SETFL, oldflags)

In this case on the Arduino, 'a' is interpreted as motor forward, 's' motor backward and space ' ' stop.

This all worked to begin with, I could start and stop the motor. However, after a period, normally less than a minute, I would lose response to any character input and had to reset the Arduino.

Investigating further it seemed like the USB connection had changed to a different tty, e.g. to /dev/ttyUSB0, and back.
I then looked in dmesg and saw the following:

 usb disabled by hub (EMI?), re-enabling…
EMI (ElectroMagnetic Interference)
The solution in this case was to remove the hub and run the USB direct to the Arduino. I'm speculating that the EMI from the motor starting and stopping was the cause of this, and reducing the cable length (and hub) was enough to lower the sensitivity beneath the threshold.

Thursday, 19 May 2016

Simple data transfer across local network

I wanted to play around with sending an receiving XML data from my laptop to a web server running on the Raspberry Pi. At the moment, I'm happy for all this to happen over my local network.

I decided to use webpy for its ease of development in allowing you to setup a simple server using Python. It can be installed with the following:

sudo easy_install web.py

It's then very simple to write a web server that takes xml passed through a post method and saves it as a file:

import web, urllib

urls = (
 '/index', 'index'
)

class index:
    def GET(self):
        x = web.input()
        return "<b>text=<b>"

    def POST(self):
        # This is the xml string passed from the client
        x = web.data()
       
        # Remove the header "data="
        cleaned = x[5:]
         
        # Write the XML string to file
        filedir = '/home/pi/Scratch/test'
        fout = open(filedir + '/test.xml', 'w')

        # Decode url characters
        fout.write(urllib.unquote_plus(cleaned))
        fout.close()
        return x

if __name__ == "__main__":
    app = web.application(urls, globals())
    app.run()


The client was the Supermarket Planner app. For testing I put the code in the call to print. The first step was to convert the data collection to an XML string.

Because I used an ObservableCollection of SelectedMeal objects, this was simple using an XmlSerialiser:

SelectedMealCollection mealData;
XmlSerializer xs = new XmlSerializer(typeof(SelectedMealCollection));
          
string xml = "";

using (StringWriter writer = new StringWriter())
{
       xs.Serialize(writer, mealData);
       xml = writer.ToString();
}


Finally, I used an async method to create and call an HttpClient with the payload created above.

Note this creates the "data=" part of the payload from the KeyValuePair which needed to be trimmed by the server before using the XML.


private async Task<string> post( string payload )
{        
    using (var client = new HttpClient())
    {
         var postData = new KeyValuePair<string, string>[]
         {
               new KeyValuePair<string, string>("data", payload),
         };

         var content = new FormUrlEncodedContent(postData);
         var response = await client.PostAsync("http://192.168.0.2:8080/index", content);

         if (!response.IsSuccessStatusCode)
         {
              var message = String.Format("Server returned HTTP error {0}: {1}.", (int)response.StatusCode, response.ReasonPhrase);
              throw new InvalidOperationException(message);
         }

         var data = await response.Content.ReadAsStringAsync();
         return data;
    }
}